Blog Entry 1: Laser Cutting
Hello, welcome to the very first blog of this new module, laser cutting. Firstly, let's go through the 4 important hazards associated with the laser cutters.
The first potential hazard is fire. Yes, due to the laser giving off extreme amounts of energy, the materials that are being cut could potentially catch on fire. I would say that the main safety control measure is administrative control. Students are taught how to deal with the different sizes of the fire. Most of the time, the fire will be small and should extinguish by itself, students should still monitor. If the fire does not extinguish, the laser cutter should be deactivated, material taken out, and stomp out the fire. If, touch wood, the fire somehow grows to be really big, the fire extinguisher is available nearby. Operating the fire extinguishers are also taught to students.

The closest fire extinguisher at the T1442 FabLab is beside the entrance door
The second hazard associated with laser cutting is the toxic fumes and gases that can be given off during cutting. The toxic fumes can harm someone's health this the safety control measure is engineering control. There is an exhaust fan installed to the internal of the laser cutter that allows the toxic fumes to be sucked into a filtration system so it can be released into the environment without causing any harm or pollution.

The silver pipe is the exhaust pipe to lead the toxic fumes out
The next hazard is staring at the laser while cutting. If you stare at the laser too long during cutting, it can damage your eyes. The safety control measure is administrative control where students are informed that they are only suppose to glance at the laser during cutting to ensure that the process is going smoothly.
The last hazard I will talk about is similar to the first one as it involves fire but the cause of this fire is due to the build up of dirt and debris from the cutting. The safety control measure is engineering control. An air assist is attached to the top of the laser head to blow air and ensure that dirt and debris does not accumulate easily.

This next section, I will be talking about the different materials that can be cut with the laser cutters.
Wood can be cut but the maximum thickness to be cut is 6mm. Wood itself has 3 different types. The types are plywood, natural wood and MDF.


Natural wood is on the left, MDF in the middle, and plywood on the right
Acrylic can also be cut but up to 5mm. Cardboard and paper can be cut as well. Art card and technical board are the two different kinds of paper than can be cut.


Cardboard is on the right, followed by art card and technical paper, these two papers are just thicker forms of paper with slight material variation
As for the materials that cannot be cut, the three main materials are metal, anything with containing chlorine, and foam.
Next will be the standard operating procedure that I followed.
1. Import drawing/objects into CorelDraw by dragging and dropping the “.dxf” file into CorelDraw or going into “Files” at the top left corner of the page and selecting “Import” then selecting the desired “.dxf” file. File must be in ‘.dxf’ form.
2. Make sure setting as seen in photo below is “Hairline”
3. Make sure objects imported are not stacked on top of each other by going to “Window” then “Dockers” then “Objects” at the top menu. Delete any stacked duplicates
4. If there are multiple objects to cut, arrange them as close as possible to each other but not touching. Save material
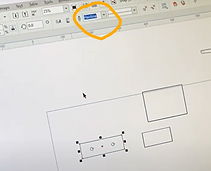
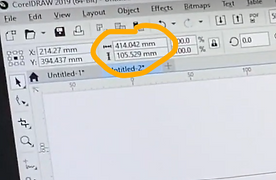
5. Use rulers to verify that the object's dimensions will fit on the cutting material. Adjust accordingly.
6. Double click the “Outline Pen” tool at the bottom right of the page and click “Width” then select “Hairline”. Then select “Color” and set the colour model to “RGB”. This step is not applicable for engraving, the width should be “None” for engraving.
7. For vector cuts the colour set “R: 255; G: 0; B: 0”. For engravings or vector engravings set “R: 0; G: 255; B: 0”. Press “Ok”
8. Additional step for engraving, double click the tool “Fill” next to the previous outline pen tool. Change the “Colour model” to “RGB” and set “R: 0; G: 255; B: 0”. Press “Ok”. If just doing vector cut or vector engraving, this step is not required
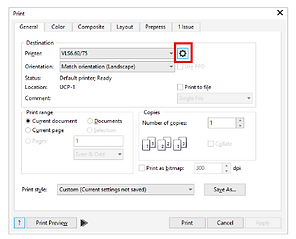
9. Click on “Files” at the top left corner then select “Print”.
10. Click on the gear-shaped icon.
11. In the pop-up click on the red “Load” button.
12. Select the corresponding “.las” file to the material being used. E.g. the material in the laser cutter is a 2mm piece of acrylic so select the file that says “2mm acrylic red cut,green engrave.las”. Press “Ok”
13. Verify that the “Mode” for “Red” and “Green” is “Rast/Vect”
14. Click on the red “Apply” button then “Ok” then “Print”.
15. Click on the UCP icon on the taskbar
16. Switch on the power to the laser cutter, air compressor, and exhaust. Then press the “Activate/Deactivate Laser cutter” button and make sure the “Play” button turns green.
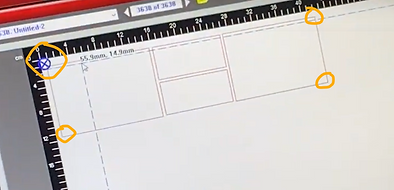
17. If using scrap materials to cut, relocate the drawing using the “Move” tool to areas that can be used for cutting.
18. Verify that where the object has been relocated to is available on the material by using the “Focus” tool to move the laser head to the area on the material. Press on all corners/boundaries of the object and check on laser cutter if there is material to cut
19.Click on “Estimated Time” tool then click “Start” to see how long the cut will take.
20. Close the lid of the laser cutter and press the “Play” button on the computer or the laser cutter itself.
21. When cut is complete, wait for 1 minute before opening the lid. Let the fumes escape into the exhaust
22. Tap on the cut material to see if it is free from the main material. Inform staff if material has not been cut.
23. Dispose of an unwanted materials
24. Press the “Activate/Deactivate” laser cutter button to deactivate the laser cutter.
25. Switch off the power to the laser cutter, air compressor, and exhaust
26. Leave the PC turned on


One of the first things I mentioned in the blog was how to deal with fires. Things you must do when there is a small fire, is observe it first but for only about 1 - 2 seconds. The fire should go out in a few seconds. If it does not go out, lift up the lid and pause the cut. Try to blow on the fire. If still the fire does not go out, stomp out the fire. Do not just watch the fire thinking it will go out eventually as it will allow the fire to grow. If the fire becomes uncontrollable, call for the lab tech and alert everyone around you. If no lab tech is nearby, go to the closest fire extinguisher and put out the fire. A fire extinguisher can be operated by pulling out the pin, point the nozzle at the base of the fire, press the lever then sweep the base from side to side.

For this last section of the blog, I will just be doing a reflection on the whole laser cutting process, learning to operating.
Honestly when I took the FabLab safety quiz for the laser cutter, it seemed quite daunting. I thought operating the laser cutter would be like some 'industrial' kind of operation. To be very frank, I thought laser cutting was holding a laser and free hand cutting something. I was obviously wrong. Overall, I would say that everything went quite smoothly when I started to take go through all the guides for the Universal Laser Cutter. A lot of gaps in my knowledge were definitely filled like how a laser cutter operates and how it works.
Creating the SOP during the learning process also 100% helped me internalize what needed to be done and better prepared me for the actual operation. Everything is quite straight forward easy to understand. The operation was also quite smooth, the only hiccup I had was when I forgot to select "print" after loading the material. I... kind of... felt the pressure from someone watching over my shoulder my every action but it is ok! That was the only hiccup and I was able to cut the test material.
I think the laser cutter being so easy to learn and use it very beneficial for anyone keen but I think that also means that everyone will be very prone to be very 'relaxed' around the laser cutter and when operating it. I think this is where there needs to be a level of focus and discipline because although easy to use, it can still injure or worst case kill.
But yes, I think this laser cutting certification will be useful in the future especially during my final year project for whenever I require to cut out any material.
Ok that is the end of this first blog. I go back to doing work. Ciao ciao.